PRODUCTS
Measure For Wideness , Measure For Future
All categories
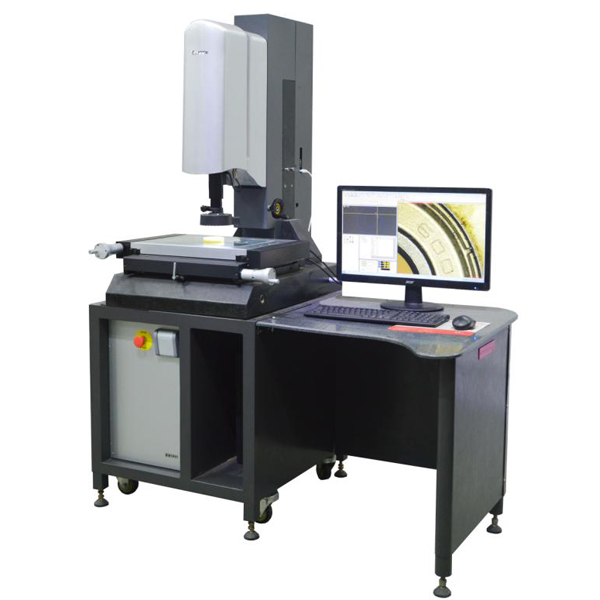
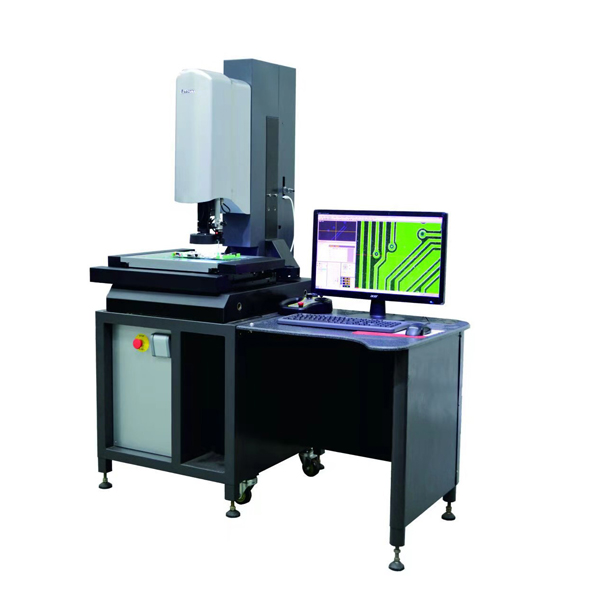
EMC-4030 full manual image measuring instrument

EMC-4030 full manual image measuring instrument

Retail price
0.0
Market price
0.0
Number of views:
1000
Product serial number
B10
Quantity
-
+
Stock:
0

Tel:0086-574-87488065     E-mail:eassonnb@163.com

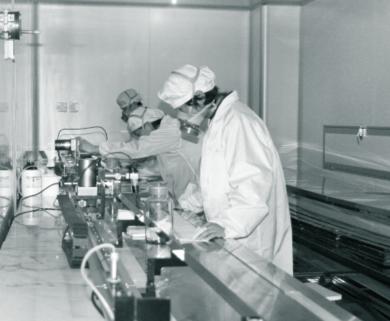
The company has professional R & D teams in optics, software, electronics, image processing, precision machinery, automation control, etc., focusing on the R & D and production of technology in the field of measurement and detection of Opto electromechanical digital precision instruments, which are widely used in the measurement of 2D and 3D complex dimensions of industrial vision and the detection of product defects. Independent research and development of industrial visual inspection system, CNC and robot control system, industrial robot workstation and other software and hardware products.

Products Detail
Parameters

EMC-4030 full manual image measuring instrument

In 10 years, the sales volume won the champion of image measuring instrument sales
One of the earliest domestic manufacturers of imagers

Technical Parameters

Specifications Model: EMC-4030

Measuring range (mm)

Dimensions (mm)

Host weight (Kg)

Maximum bearing weight (Kg)

X

Y

Z

L

W

H

400

300

250

1500

1000

1820

410

20

Measurement Accuracy

Optical one-dimensional length measurement error: EU X/Y(1D)(μm)

2.5+L/200  MPE complies with JJF 1318-2011

Optical two-dimensional length measurement error: EU XY(2D)(μm)

2.8+L/200  MPE complies with JJF 1318-2011

Two-dimensional detection error: PF2D(μm)

2.8        MPE complies with JJF 1318-2011

Image probe detection error: PFV2D(μm)

2.8        MPE complies with JJF 1318-2011


Serial number

Name

Specification and description

1

Host and machine

The main body of the fuselage is made of high-precision natural granite, which has stable temperature characteristics and resistance to aging deformation.

2

Control System

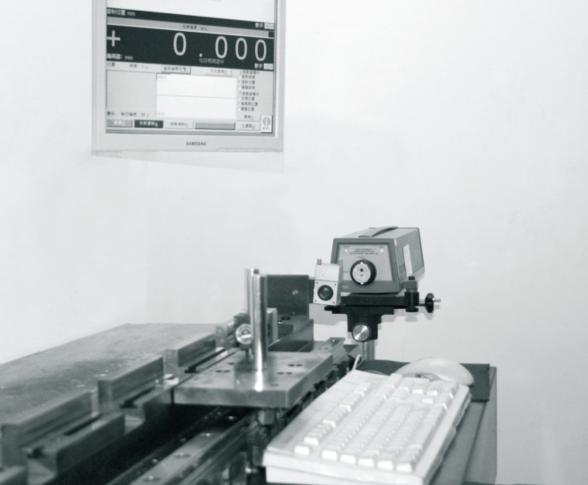
USB network board to ensure the stability and safety of the machine

3

Easson measurement software system

Automatic version of optical vision measurement software

4

Camera

1.3 million digital high-definition web camera

5

Grating ruler

0.01μm absolute grating

6

Guide

The three axes adopt precision ball screw guides, the speed is greatly improved, and the operation is stable

7

Lens

Easson independently designed TC precision manual zoom manual zoom telecentric lens (standard coaxial light) actual magnification: 30-145×

8

Lighting system

5 rings and 8 zones LED cold light source is independently controlled for each segment, 256 levels of brightness adjustable

9

Brand Computer

WIN7/WIN10

23.8 HD

10

Computer Desk

Yixin

Environmental conditions and requirements

The temperature requirements of the imager room:

Room temperature (temperature control room) 

18~22°C

Temperature gradient (time)

1°C /h

Temperature gradient (time)

2°C /24h

Temperature gradient (space)

1°C /m

Humidity requirements for imaging room:

relative humidity

40-70%

Power requirements:

Voltage

220V ± 10%

frequency

50/60 Hz

shock

Below 15Hz<0.001g

power consumption

1000VA

Electrical equipment requires reliable grounding: the grounding resistance is less than 4 ohms

3. Software features
Introduction to the main functions of the smart measurement software Easson2D
1. Basic functions:
●Cartesian coordinate/polar coordinate conversion ●Absolute/relative/working coordinate conversion
●Metric/English conversion ●Degree/degree, minute, second conversion
●Point/Point Group ●Two-point/multi-point seeking line
●Three-point/multi-point finding circle and arc ●B-spline line
●The distance between two points ●The average distance between two lines
●The distance between dots and lines ●The distance between two circles
●Circular line distance ●The angle and intersection between two lines
2. Special functions
1. The software controls the light source. The upper light source is a four-phase lamp, and the lower light source is a straight light source, which increases the adaptability of the machine.
2. There is no need to adjust the position for measuring the workpiece, and the software provides coordinate translation, rotation, and position.
3. Mark/move the size directly in the image and geometric area. Straight line trimming and extension function.
4. Geometry zone points, lines, circles/arcs and straight line endpoints, midpoints, circle centers and quadrant points are automatically captured.
5. Adjust the CCD parameter settings to improve the self-adaptive force; remove the burr function to obtain the measurement data correctly.
6. Use the image tool to quickly and automatically grab the boundary points of the basic geometric contours, and directly fit the lines, circles, and arcs.
7. The workpiece in the measurement area is zoomed in and outputted by the camera and converted into (.bmp, .jpg).
8. Measurement data output, converted into WORD (.doc), EXCEL (.xls).
9. SPC function, directly output control chart, process capability index, and convert it into WORD, EXCEL
10. Direct output of mechanical graphics in .dxf format to realize 2D reading function and seamless connection with AutoCAD and other software.
11. Can be transferred to .DXF format files, and compared with the actual workpiece or measurement graphics. And you can directly pick two points in the image area to get the error measurement value.
12. Provide in-plane straightness, roundness, and angle analysis for effective quality inspection
13. The accuracy of the machine is compensated to improve the measurement accuracy.
14. The software can measure multi-deformation, groove shape, arc chamfering and virtual measurement.
15. Re-measurement function: This function can re-change the measurement method, lighting, magnification, etc., for the elements that have been measured, and then refresh the measurement data, and the related element data will also be refreshed (such as: two-line construction distance, if If one of the lines is re-measured, the distance element data will also be refreshed).
16. Modify, edit and view the edge-seeking status: The software can modify and edit the edge-seeking range, light source brightness, magnification, etc. of any measurement element. You can also view the edge-finding status of a certain element measured before (including the position of the edge-finding, the brightness of the light source used, the magnification and the original point taken, etc.), so that the user can control the status of the whole process of measurement.
17. The element name and size name can be modified to be consistent with the customer's drawing: the customer can modify the element name and size name at will. For example: C1 (circle 1) can be modified to the name you want. And the radius, diameter, circumference, area and other names of C1 can be changed to what you want, so as to fully meet the needs of the drawing.

Image measuring instrument installation and acceptance standards

1. Equipment acceptance, inventory and installation adjustment test acceptance
1.1 Acceptance of equipment
The acceptance of equipment is divided into two stages, namely: the first and final acceptance, and the method of acceptance shall be carried out in accordance with the technical agreement reached by both parties.
1.1.1 The first acceptance: After the equipment has passed the factory inspection and acceptance, after the equipment is delivered to the buyer’s project site, the relevant personnel of the buyer and the seller jointly open the box and inspect the goods; if there are problems such as shortage of goods, quality, damage, etc., detailed records should be made. The seller will first immediately and unconditionally replace or make up for the buyer, and then check the reason and hold the responsible person accountable. After no doubt, the first acceptance was passed. The seller also provides the test report and product qualification certificate before leaving the factory;
1.1.2 Final acceptance: After the installation and commissioning of equipment and materials are completed and the acceptance criteria are reached, the buyer and the seller shall send personnel to jointly check and accept the goods. The buyer and the seller shall confirm that the final acceptance is qualified.
2.1 Installation and adjustment test acceptance
The seller is responsible for completing the installation and commissioning of the equipment at the buyer’s site free of charge. For installation at the buyer’s site, the buyer should prepare the gas, electricity, grounding protection and other infrastructure in advance, and notify the seller by fax. If there is any problem, communicate in advance to ensure a smooth installation. The company is responsible for the installation and commissioning of the measuring machine. All packaging boxes can only be opened under the supervision and approval of the engineer. According to needs, users need to provide internal disassembly, transportation and in-place support. The final acceptance will be carried out according to the enterprise standard Q/320505AD005-2012. After the commissioning is completed, the equipment shall be checked and accepted, and the acceptance of the equipment shall be carried out in accordance with the technical agreement reached by the two parties. Various technical indicators shall be implemented in accordance with the contents of the "Technical Agreement" signed by both parties. After the acceptance is completed, both parties shall jointly confirm, and the representatives of both parties shall sign the "Installation Commissioning Test Acceptance Report.
Packaging and transportation plan of image measuring instrument
Packaging and shipping


  1. Use good wooden box packaging and road transportation to ensure good equipment. The packaging and transportation process issues are borne by the seller.
  2. After the goods arrive at the buyer, the seller’s personnel will arrive at the buyer’s site within one working day to unpack the goods and install and debug the equipment.

Image measuring instrument installation plan and plan, installation, construction organization and personnel situation

Installation plan
Before installing the instrument, please read this "Precautions for Installation"
Installation Precautions:


  1. Please place this product in a ventilated and dry place, and try to keep the ambient temperature between 20℃-25℃.
  2. Do not place this product in dusty and humid places.
  3. This product uses 220V, 50-60HZ AC power supply. This product requires a good connection and grounding of the power supply.
  4. Please place this product away from strong electric fields or strong electromagnetic interference sources, such as AC cabinets, large machine tools, electromagnetic irons, and EDM machines.
  5. To ensure measurement accuracy, please place this product away from vibration sources, such as punches, vibrating machines, etc.
  6. Do not disassemble or adjust product parts by yourself.
  7. Do not use accessories not produced or provided by our company.
We could not find any corresponding parameters, please add them to the properties table

Training program and after sales service

Name to build the foundation of quality, talent as the driving force, innovation and development, service tree word of mouth, to win customers with integrity. Ningbo Yixin Photoelectric Technology Co., Ltd. is committed to the innovation of key technologies of measuring instruments, sincerely cooperate with customers, learn from each other, form an excellent team with cohesive force, and serve customers well.

1. After the instrument arrives at the user's location, the user will prepare the power required for the normal operation of the instrument, and the professional engineer will open a new box to check the instrument.

2. After the engineer checks the site of the instrument, the installation, debugging and accuracy compensation are carried out, and the accuracy is tested again after installation.

3. The training equipment is consistent with the model and function of the instrument purchased by the user. Be responsible for the comprehensive training on the basic principle, use, operation and maintenance of products.

4. Training operation standard, operation "should know" and "should know".

5. Training contents: on-off operation, operation preparation, instrument calibration, measurement steps, precautions, common problem handling process.

6. Instrument maintenance training: maintenance parts name, maintenance content explanation, maintenance cycle, maintenance methods and standards, maintenance personnel responsibility post requirements.

7. Each instrument is attached with technical data such as instruction manual, certificate of goods, packing list, etc;

8. There are detailed inspection records in the process of equipment installation and commissioning, and the commissioning inspection results meet the relevant national standards. Fill in the acceptance report and report to the user and manufacturer.

9. The warranty period is not more than 13 months from the date of arrival of the goods, and is responsible for the lifelong maintenance of the equipment. During the warranty period, the maintenance fee is free, and the spare parts that are not damaged by human are replaced free of charge.

10. After receiving the user's repair report, immediately call to communicate and guide the solution. If the phone can't solve the problem, give the solution within two hours, and arrive at the customer's site to solve the problem within 24 hours( (except national statutory rest days)

11. Free software upgrade service within three years.

Cooperative partner

合作合作合作合作合作合作合作合作合作合作合作合作合作合作合作合作合作合作 合作合作合作合作合作合作合作合作合作合作合作合作合作合作合作合作合作合作合作合作

Honor

合作 合作


Company Profile

合作 合作
合作合作合作

Hot Products

ATM-3020 automatic high-precision two-dimensional image measuring instrument
The company has a professional R&D team in optics, software, electronics, image processing, precision machinery, automation control, etc., focusing on the technical R&D and production in the field of optical, electromechanical digital precision instrument measurement and testing, and is widely used in industrial vision 2D and 3D complex size measurement And the detection of product defects. The company has a professional R&D team in optics, software, electronics, image processing, precision machinery, automation control, etc., focusing on the technical R&D and production in the field of optical, electromechanical digital precision instrument measurement and testing, and is widely used in industrial vision 2D and 3D complex size measurement And the detection of product defects. Independent research and development of software and hardware products such as industrial vision inspection systems, numerical control and robot control systems, and industrial robot workstations.
Learn More
ATM-3020T automatic high-precision two-dimensional image measuring instrument
The company has a professional R&D team in optics, software, electronics, image processing, precision machinery, automation control, etc., focusing on the technical R&D and production in the field of optical, electromechanical digital precision instrument measurement and testing, and is widely used in industrial vision 2D and 3D complex size measurement And the detection of product defects. The company has a professional R&D team in optics, software, electronics, image processing, precision machinery, automation control, etc., focusing on the technical R&D and production in the field of optical, electromechanical digital precision instrument measurement and testing, and is widely used in industrial vision 2D and 3D complex size measurement And the detection of product defects. Independent research and development of software and hardware products such as industrial vision inspection systems, numerical control and robot control systems, and industrial robot workstations.
Learn More
ATM-3020V Automatic high-precision two-dimensional image measuring instrument
The company has a professional R&D team in optics, software, electronics, image processing, precision machinery, automation control, etc., focusing on the technical R&D and production in the field of optical, electromechanical digital precision instrument measurement and testing, and is widely used in industrial vision 2D and 3D complex size measurement And the detection of product defects. The company has a professional R&D team in optics, software, electronics, image processing, precision machinery, automation control, etc., focusing on the technical R&D and production in the field of optical, electromechanical digital precision instrument measurement and testing, and is widely used in industrial vision 2D and 3D complex size measurement And the detection of product defects. Independent research and development of software and hardware products such as industrial vision inspection systems, numerical control and robot control systems, and industrial robot workstations.
Learn More
ATM-3020VL Automatic high-precision two-dimensional image measuring instrument
The company has a professional R&D team in optics, software, electronics, image processing, precision machinery, automation control, etc., focusing on the technical R&D and production in the field of optical, electromechanical digital precision instrument measurement and testing, and is widely used in industrial vision 2D and 3D complex size measurement And the detection of product defects. The company has a professional R&D team in optics, software, electronics, image processing, precision machinery, automation control, etc., focusing on the technical R&D and production in the field of optical, electromechanical digital precision instrument measurement and testing, and is widely used in industrial vision 2D and 3D complex size measurement And the detection of product defects. Independent research and development of software and hardware products such as industrial vision inspection systems, numerical control and robot control systems, and industrial robot workstations.
Learn More
Easson
Easson
Easson
Easson
Easson
Easson

Easson

© 2021  Ningbo Easson Photoelectric Technology Co., Ltd All rights reserved.   浙ICP备18042770号-1   Powered by www.300.cn

© 2021  Ningbo Easson Photoelectric Technology Co., Ltd 

浙ICP备18042770号-1   Powered by www.300.cn